DIY Map
Configuring the Data File
- Global Configuration
- States
- Regions
- Points
- Lines
- Arcs
- Customizing Icons
- Embedding the Flash file in your Web page
Check out the data file for the world map. You can see each the file is divided up into <state>’s.
Global Configuration
default_color: This is the color of the states that do not have any data associated with them. In this case, it will display them in a light gray:
	<state id="default_color">
		<color>bbbbbb</color>
	</state>
background_color: This is the color of the map background, the ocean and other bodies of water. In this case, it will display a white background:
	<state id="background_color">
		<color>ffffff</color>
	</state>
To make the background transparent, use:
	<state id="background_color">
		<opacity>0</opacity>
	</state>
You also need to specify <param name="wmode" value="transparent">, and in the <embed> tag add the attribute wmode="transparent"
outline_color: This is the color of the borders between states and provinces. In this case, it will display a dark gray:
	<state id="outline_color">
		<color>666666</color>
	</state>
If you do not want to display the state borders at all, add <opacity>0</opacity>
default_point: This sets the default attributes for all points on the map. Set the default color in the <color> field. In this case, it will display a bright red. The <size> attribute sets the default size. The <opacity> attribute sets the default opacity. A <size> of 10 will show a dot 10 pixel diameter dot when zoomed out at 100%. <src> loads a custom icon for the default point. All default_point attributes are overridden attributes specified in a point_range or individual point configuration block.
	<state id="default_point">
		<color>ffff00</color>
		<size>20</size>
		<opacity>70</opacity>
		<src>lighthouse.swf</src>
	</state>
scale_points: This sets the size of the points when zooming into the overall map. If you leave this out, the points will retain their size relative to the map, i.e. a small point when zoomed out will appear to be a large point when you zoom in to the map. If you set the <data> to 100, the point will not change visible size when you zoom in to the map, i.e. a small point when zoomed out will still appear small when you zoom in to the map. If you set the <data> to 50, the point will change size a little bit when you zoom in to the map, i.e. a small point when zoomed out will appear little larger when you zoom in to the map, but will still shrink along the way. Try it out and find the setting that works for you. <data> can be any number between 25 and 100.
	<state id="scale_points">
		<data>50</data>
	</state>
line_color: This sets the default color of lines on the map. In this case, it will display a bright blue:
	<state id="line_color">
		<color>0000ff</color>
	</state>
arc_color works the same way.
hover: This is where we set the font size, text color, and background color of the text field that displays the state name and hover data. A size of 14 will show text 14 pixels tall. If none of this information specified, the default font is 11, with white text on black.
	<state id="hover">
		<font_size>14</font_size>
		<font_color>ffffff</font_color>
		<background_color>990000</background_color>
	</state>
range: This determines the color of all states that have data within the range you set. Colors are indicated using hex codes (without the #). You can use a single number of set a minimum and maximum. The minimum and maximum numbers must be separated by a dash and two spaces. The range below will color gray all states with <data> of 0, and will color red all states with <data> between 1 and 10.
	<state id="range">
		<data>0</data>
		<color>666666</color>
	</state>
	<state id="range">
		<data>1 - 10</data>
		<color>ff0000</color>
	</state>
<state id="point_range">, <state id="line_range">, and <state id="arc_range"> all work the same way to set the color of points, lines, and arcs respectively.
point_range can also take a <src>, <size>, and <opacity> variables. Set the pathname of a JPEG or SWF file in the <src> to display a custom image or movieclip for points that match the data range. This can also be overridden by setting a <src> for an individual point (see below). If an <src> is set, any color set for data this range is ignored. In this case, points matching the data range of 1 through 10 will display the forest_fire.swf movie clip. Points matching a data range of 0 will display a gray dot around 15 pixels in diameter.
	<state id="point_range">
		<data>0</data>
		<color>cccccc</color>
		<size>15</size>
	</state>
	<state id="point_range">
		<data>1 - 10</data>
		<src>forest_fire.swf</src>
	</state>
Setting the <size> in the data range will override the <size> set in the default_point block.
zoom_out_button: One of my design goals was to let the cursor behavior guide the interface and not clutter up the screen with buttons. Still a couple of people requested a zoom out button, so I added the option. To display a text button use the following. The <name> is what is displayed as the text of the button. The <data> determines the location of the button, and can be any one of the following: NW, N, NE, E, SE, S, SW, or W. The button will display when you zoom in. You can also set the font size, text color, and background color of the zoom out button as follows.
	<state id="zoom_out_button">
		<name>Zoom Out</name>
		<data>SE</data>
		<font_size>14</font_size>
		<font_color>ffffff</font_color>
		<background_color>990000</background_color>
	</state>
Note, independently of this option, you can use the right-click menu to zoom out.
zoom_mode: There currently are three zoom modes. The default mode, 'no zoom', and 'region'. The default zoom mode zooms the map into states when those are clicked. To use this, leave out the 'zoom_mode' block. When the zoom_mode is set to 'no zoom', the map will not zoom into states or points when clicked, it simply gets the URL specified. A zoom_mode of 'region' zooms the map in two stages: the first click zooms into a region, a second click zooms into a country. See more on setting regions below.
	<state id="zoom_mode">
		<data>no zoom</data>
	</state>
show_name: By default, the rollover will display the state 'name' followed by its 'hover.' To display the region name use:
	<state id="show_name">
		<data>region</data>
	</state>
If you do not want to display any text at all use <data>none</data>
first_zoom: Sets the initial zoom when the map launches. It is equivalent to “automatically” clicking a state or a region that you define.
	<state id="first_zoom">
		<data>TX</data>
	</state>
You can also set the first zoom in your HTML embed tags as follows:
world.swf?data_file=data.xml&first_zoom=AF
zoom_out_center:
Use this to focus in on a particular region or state when the map when zoomed out. This sets the center of your maximum zoom out region, and should be a latitude and longitude in decimal degrees separated by a comma (with no spaces). If no zoom_out_center value is set, the map automatically centers to fit the entire map in the frame when zoomed out.
	<state id="zoom_out_center">
		<loc>40.745,-73.985</loc>
	</state>
zoom_out_scale: Use this to limit the level of zoom when zoomed out. A zoom_out_scale of 100 fits the entire map within the frame when zoomed out. If no zoom_out_scale value is set, the map automatically defaults to a zoom_out_scale of 100.
	<state id="zoom_out_scale">
		<data>200</data>
	</state>
See the example below which sets a zoom_out_center and zoom_out_scale.
View the data file.
States
And now for our state data. A state configuration looks like this:
	<state id="BE">
		<name>Belgium</name>
		<data>2</data>
		<hover>Ratified June 06, 2002</hover>
		<url>http://www.belgium.be/</url>
		<target>_blank</target>
	</state>
Each <state> has an ID associated with it. Don’t change these ID’s — these are how the map associates your data with the shapes in the file. I’ve used the FIPS codes to name the country shapes.
data: This is the number that is tested against the <range> to determine what color to show. If no <data> is specified, the <default_color> is used.
name: This is the state name displayed when the mouse is over the state shape.
hover: This is text displayed when your mouse is over a state. If no <hover> text is specified, only the state name will display. You can enter multiple lines of text by including a linebreak in your <hover> text, like so:
<hover>30% of roses are red.
75% of violets are blue.</hover>
Tabs are also displayed, so mind that indenting text inside the hover field.
url: If a <url> is specified, clicking on the state will zoom into it and load a doc icon. Clicking on this icon will load the external Web page you specify in the <url> field. If no <url> is specified, clicking on the state will just zoom in to it.
You can issue a javascript command from the <url> as follows:
<url>javascript:window.alert('Bienvenidos!');</url>
Note, the get url does not work locally, only on a Web server. Also, url’s with question marks are truncated when sent to the browser. To work around this, replace each question mark with %3F.
target: Target is not required, but is useful if you are loading the map into a page with frames. If no <target> is specified, the default target is _self. Specifying a <target> of _blank will open that external URL in a new window when the info icon is clicked.
Regions
Regions are groups of states, and are defined as follows:
	 <state id="region">
		 <name>South America</name>
		 <data>FG,FK,AR,BL,BR,CI,EC,CO,PA,PE,UY,GY,VE,NS</data>
		 <loc>13.3,-85.1,-56.6,-29.9</loc>
	 </state>
The <name> is what displays in the text field when the mouse rollover the region area. <data> defines which countries are part of the region.
When you click on a region it will center that region area. To customize the framing of this zoom area, you can specify a <loc>, which is the latitude and longitude of the top-left and bottom-right corners of the area. To help determine the coordinates of your frame, you can use:
<state id="show_coordinates"></state>
See the map below and its data file:
States can exist in more than one region. If you click on a state in multiple regions, the map will zoom to the lowest region in the configuration list.
To display the region name on rollover, use:
<state id="show_name">
	<data>region</data>
</state>
When zoom_mode is set to 'region' the map zooms in two stages: the first click zooms into a region, a second click zooms into a country. Accordingly, when focused on a country, clicking zooming out returns to the most recently clicked region. Zooming out again returns to the full map.
	<state id="zoom_mode">
		<data>region</data>
	</state>
Points
point: To plot a point on the map, use the state id “point” and supply the latitude and longitude in the <loc> field. There are many ways to configure a point. You can don’t have to use them all, but you do need a <name> and <loc>.
	<state id="point">
		<name>New York City</name>
		<loc>40.745,-73.985</loc>
		<url>http://backspace.com/mapapp/</url>
		<hover>Get DIY Map</hover>
		<opacity>75</opacity>
		<size>3</size>
		<data>1</data>
		<color>ffcc00</color>
		<src>globe.jpg</src>
		<target>_blank</target>
	</state>
name: This is the name displayed when the mouse is over the point.
loc: Points must have a <loc> specified. This should be a latitude and longitude in decimal degrees separated by a comma (with no spaces). You can download this list (32 Kb) of major cities around the world and their latitude and longitude, or see this massive dataset from world-gazetteer.com
url: If a <url> is specified, clicking on the point will load that Web page. If no <url> is specified, clicking on that point will just zoom in to it.
You can issue a javascript command from the <url> as follows:
<url>javascript:window.alert('Bienvenidos!');</url>
Note, the get url does not work locally, only on a Web server. Also, url’s with question marks are truncated when sent to the browser. To work around this, replace each question mark with %3F.
hover: This is the text displayed when your mouse is over a point. If no <hover> text is specified, only the state name will display. You can enter multiple lines of text by including a linebreak in your <hover> text, as mentioned above.
opacity: This sets the opacity of the point, from 0 to 100. This is useful when points overlap. A point with an <opacity> of 100 is completely solid. A point with an <opacity> of 0 is completely transparent. If no opacity is set, the default opacity is 100.
size: In addition to the default point_size, you can change the size of individual points by specifying a value for the <size>. This number is roughly the number of pixels in the point diameter. A <size> of 5 will show a 5 pixel diameter dot when zoomed out at 100%.
data: This number is tested against the <point_range> to determine what color or icon to use. (See point_range above.) If no <data> is specified, the default_point <color> will be used.
color: You can set the color of the points by either associating the point with a data range color, the default_point color, or by setting it individually with the color attribute.
src: Set the pathname of a JPEG or SWF file here to display a custom icon for this point. Specifying a <src> here overrides an image set in the point_range or default_point.
target: As mentioned above, target works like the HTML attribute for links. If no <target> is specified, the default target is _self. Specifying a <target> of _blank will open that external URL in a new window when you click on the point.
See also the default_point, scale_points, and point_range options under Global Configuration.
Lines
line: To plot a line on the map, use the state id “line” and supply the latitude and longitude in the <start> and <stop> fields:
	<state id="line">
		<name>New York to London</name>
		<start>40.744806,-73.985283</start>
		<stop>51.32,-0.5</stop>
		<stroke>2</stroke>
		<data>1</data>
	</state>
start and stop: These are the origin and destination of the line in latitude and longitude expressed in decimal degrees separated by a comma (with no spaces).
data: This number is tested against the <line_range> to determine the color of the line. If no <data> is specified, the default <line_color> will be used.
name: This is the point name displayed when the mouse is over the line.
stroke: This is the thickness of the line.
Arcs
arc: Plotting an arc is just like plotting a line. Use the state id “arc” and supply the latitude and longitude in the <start> and <stop> fields:
	<state id="arc">
		<name>New York to London</name>
		<start>40.744806,-73.985283</start>
		<stop>51.32,-0.5</stop>
		<stroke>2</stroke>
		<data>1</data>
	</state>
Customizing Icons
You can load an external JPG or SWF file to customize the state info icon or points. Custom point icons can be set as a default for all points, associated with a particular data range, or set for an individual point.
If a state has an external URL associated, it displays a basic info icon when clicked.
![]()
To change the default info icon, use the state_info_icon block:
	<state id="state_info_icon">
		<src>information.swf</src>
	</state>
![]()
By default, the point icon is a little dot.
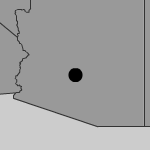
To change the default point icon, add a src attribute in the default_point block, point_range block, or in a <state id="point"> block. You can change the size of the icon in any of those blocks as well.
![]()
Set the <src> to the pathname of a JPEG or SWF file for your custom icon. If using relative URL’s, use the pathname from the page embedding the SWF file, not the data file.
Unfortunately, Flash can not load GIF’s or PNG’s dynamically, but you can embed these into an SWF. PNG’s embedded into an SWF will also display their alpha channel nicely. My default info icon is a PNG with a little transparent shadow. Note, bitmap images tend to show up a little crunchy when scaled in Flash so avoid fine borders and detail.
Registering Your Custom Icons
By default, custom image icons are centered based on their height and width. There is no other way to register a JPEG. Custom movieclip icons are centered based on their height and width from top left point (0,0) on the Flash stage.
If set for a state info icon, the center of the icon will align with the center of the state shape that was just clicked. If set for a data point, the custom icon center is aligned with the latitude and longitude of that point.
In some cases, however, you may not wish to register your icon at its center.
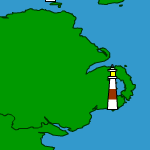
This lighthouse movieclip is aligned at the top left of the stage.
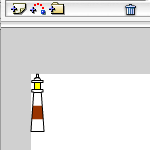
When plotted on the map by its center, the bottom floats out in the water.
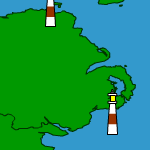
To align the lighthouse icon from its base, move it up half its height in Flash so the bottom is where the center was.
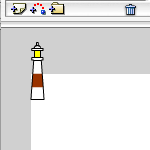
This puts the lighthouse right on the shore.
Embedding the Flash file in your Web page
Here’s a standard way of embedding a Flash file in the HTML of your Web page:
<object classid="clsid:d27cdb6e-ae6d-11cf-96b8-444553540000"
codebase="http://download.macromedia.com/pub/
shockwave/cabs/flash/swflash.cab#version=7,0,0,0"
width="550" height="300" id="zoom_map" align="top">
<param name="movie" value="world.swf" />
<param name="quality" value="high" />
<param name="bgcolor" value="#FFFFFF" />
<embed src="world.swf" quality="high" bgcolor="#FFFFFF"
width="550" height="300" name="Clickable World Map" align="top"
type="application/x-shockwave-flash"
pluginspage="http://www.macromedia.com/go/getflashplayer">
</embed>
</object>
Feel free to change the height and width parameters here. DIY Map will expand to fill the space and zoom to fit the center.
If you don’t specify a data file, it will look for one named data.xml in the same directory as the Web page calling the Flash file.
You can specify additional data files by replacing “world.swf” in the example above with:
world.swf?data_file=pathname/filename.xmlwhere “pathname” is the relative address your Web page to the data file named “filename.xml.” Note that’s the path from the Web page embedding the Flash file, not the path relative to the SWF file itself.
You can also set the first zoom in your HTML embed tags as follows:
world.swf?data_file=data.xml&first_zoom=AF
or even:
world.swf?data_file=data.xml&background_color=ff0000& outline_color=440000&default_color=000000